|
|
|
|
#121 | |
|
Advanced Member
Join Date: Apr 2014
Location: N.C.
Posts: 727
|
Quote:
__________________
" If your like most people its not for you " VULCAN VAQUERO Login or Register to Remove Ads |
|

|
|
|
#122 |
|
Advanced Member
Join Date: Oct 2014
Location: South Florida
Posts: 710
|
I just installed these lowering links yesterday on my buddy's Vaq. It was pretty straight forward. Took about an hour or so, because I took my time and carefully read the instructions since there are a few operations that have to be performed on the left side of the bike that are different from the right. Great quality product. My friend can now plant his feet on the ground.
__________________
2004 Vulcan 1500 Classic "Sasha" (SOLD)  2014 Vulcan Vaquero ABS SE "Candie" On the 1500, too much to list. On the Vaquero: V&H slash cut slip ons Power Commander 5 and Ivan-ized ECU Chuckster's BAK Aux Audio adapter with bluetooth receiver. Mustang 2 up Touring Seat w/ driver and passenger backrest Kuryakyn Longhorn highway pegs. Kawasaki 12 volt charger Longer 1600 meanstreak SE kickstand Full LED Daymaker light mod. |

|
|
|
#123 | |
|
Member
Join Date: Oct 2013
Location: ontario, canada
Posts: 177
|
Quote:
 Cheers. Cheers.
|
|

|
|
|
#124 |
|
Jr. Member
Join Date: Oct 2015
Posts: 6
|
Did you lower the front with the 21" and the rear? If so how does it ride? I may be interested in the links I to have a 30" inseam and hate being on my tip toes. Email me at travisweleschuk@yahoo.ca
|

|
|
|
#125 |
|
Member
Join Date: Dec 2013
Location: South Dakota
Posts: 163
|
This might answer some off your questions.. http://www.vulcanbagger.com/forums/s...ad.php?t=36551
Login or Register to Remove Ads |

|
|
|
#126 |
|
Member
Join Date: Feb 2016
Location: Nova Scotia
Posts: 403
|
Lowering Link Install
While waiting for the links to arrive (Cursed Post Office, any slower it be painful) I decided to modify the saddlebag mounts.
A pic of the left side before: 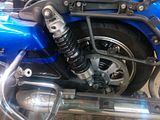 Both of them off on the bench before cutting: 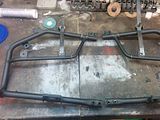 After I cut them, there was a gap at the end of the tube. Understandable because of the bend of the tubing not being 90deg and you're removing an inch of length: 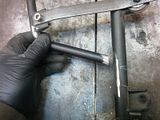 I could have welded them up by not aligning them properly but that would look..rough so instead I opted to weld the cut off pieces from the short end back on the long end: 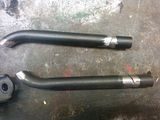 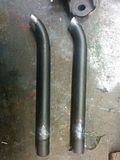 All welded up, just have to paint them and they're finished: 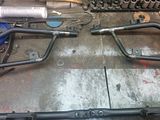 All done and installed: 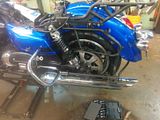 . .Changed the rear brake fluid while I was there. My hip started acting up so I'm leaving the clutch 'till tomorrow. Nothing hard to this at all, if I had to pick the worst part it was removing all the plastic, even then it wasn't too bad. Of course I wanted to sit on the bike, start it up and listen just because but of course my battery is toast. I think the tender was unplugged so come Monday it's battery time...Mike |

|
|
|
#127 |
|
Member
Join Date: Feb 2016
Location: Nova Scotia
Posts: 403
|
All done:
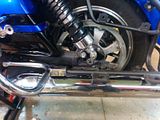 No problems. Never sat on it, it's a pia to get it up on the lift so I never even sat on it so I can't comment on the height difference. I will once I get on it. Mounted my extra park, stop and turn light under the trunk while I was at it, changed the air filter, put the new battery in so all I need now id good weather....Mike |

|
|
|
#128 |
|
Member
Join Date: May 2015
Location: Chicago
Posts: 57
|
so im really short and bought this link plus the progressive lowering drop in kit, hoping it will help me be flat footed. plus preparing the bike for the 21 in the front.
|

|
|
|
#129 |
|
Member
Join Date: Apr 2015
Location: Mead, Colorado
Posts: 70
|
Ordered April 5th via eBay, arrived April 8th. Was packaged well and good instructions, although I have difficulty picturing some of the stuff reading the instructions, it made sense when I did the work. Would be helpful if they had an instruction video and just sent a card with a link on it. Not a big deal but would be something for them to think about doing, maybe more people would jump on doing it if they knew how easy it was to complete the job.
Got to play around with my new Condor Pit Stop bike support which made it super easy to jack up the bike for the work. http://www.amazon.com/Condor-Pit-Sto...ilpage_o00_s00 Only issue was playing with the washer placement on the left side bracket to get it to sit correctly. Following the instructions the bracket didn't sit all the way down on the swing arm. Had to use a thin washer to space it out a tad and all was well. I did not space the left bag support as suggested in the instructions. If I see it making contact I'll do as small of spacing that I can get away with. I whomped on it yesterday with some high speed dips and couldn't get the bike to bottom out and I'm 200 pounds. I'll play with the air pressure some when I get my air shock single block and install it since I'll have to re-air the shocks after that. It's not real noticeable looking at the bike, but sitting on it I like the change in riding position as well as the handling and ride improvements. It's a considerable difference which I didn't think it would be. I fancy myself as being very good and low speed handling so that was never an issue, but I've had a couple issues, with a 30" inseam, where I've lost footing trying to back the bike and it's a bitch to catch when that happens. Impression is good overall, got about 20 miles of riding in so far and I'm happy with the end result for the cost.
__________________
If driving a car is like watching a movie... Then riding a motorcycle is like staring in a movie... And riding a motorcycle with a stereo is like staring in a movie with a great soundtrack!!! |

|
|
|
#130 |
|
Jr. Member
Join Date: Jul 2016
Location: Moorpark,Ca
Posts: 35
|
Anybody have any handling input after lowering?
|

|
|
|
#131 |
|
Member
Join Date: Apr 2015
Location: Mead, Colorado
Posts: 70
|
Yes I have some input. I found shock setup to be more critical after lowering. I was running rebound on II and I find that not to be suitable. With rebound on III and increasing my PSI by 10 pounds my wallowing issue was resolved when taking sweepers at high speed and hitting bumps.
No issues with bottoming out or any ride quality complaints.
__________________
If driving a car is like watching a movie... Then riding a motorcycle is like staring in a movie... And riding a motorcycle with a stereo is like staring in a movie with a great soundtrack!!! |

|
|
|
#132 |
|
Jr. Member
Join Date: Jul 2016
Location: Cincinnati, Ohio
Posts: 43
|
This question is for Luvernekaw or anyone else who has sent their brackets to him for the modification on the Voyager.
How much is it to have the brackets modified at his shop? When the brackets come back are they just ready to bolt back into place or will I need to make any other adjustments to mount them up? I know my mechanical limitations and they pretty much stop after unbolting and bolting something back on. |

|
|
|
#133 | |
|
Advanced Member
Join Date: Sep 2015
Posts: 542
|
Contact them as they were very good with communicating with me upon inquiring. They even sent me the instructions.
Quote:
|
|

|
|
|
#134 |
|
Jr. Member
Join Date: Jul 2016
Location: Cincinnati, Ohio
Posts: 43
|
I bought the lowering link a few weeks ago. I have to admit, I didnt think it would be the answer but I figured I would give it a try. Well, yesterday I installed it and WOW what a difference it made. I didnt adjust the front at all but I dont think I will need to. I went from being tiptoe to flat footed. By far this is the best mod I have done to my Voyager yet.
Next is to Ivanize. I hope I am as happy with that as I am with this lowering link. |

|
|
|
#135 | |
|
Member
Join Date: Mar 2010
Location: Van Buren, AR
Posts: 462
|
Quote:
T
__________________
Heath Cady aka "Talon" VBA #01416 2012 Vaquero SE Candy-Lime Green/Black aka "T'Kehla" 2005 Nomad 1600 Black/Silver aka "Mystique" (SOLD) 2006 Vulcan Classic aka "Lil'Wolf" (SOLD)   "Life isn't a race; no one gets out alive. May as well slow down and enjoy the ride." "Life isn't a race; no one gets out alive. May as well slow down and enjoy the ride."
|
|

|