|
|
|
|
#1 |
 Join Date: Aug 2007
Location: Newmarket Ontario Canada
Posts: 35,387
|
LED Signals Without Load Equalizers
Heres another handy article from Jay (Jestephens), Check out the link to the Youtube video at the end. Thats a bright tailight!
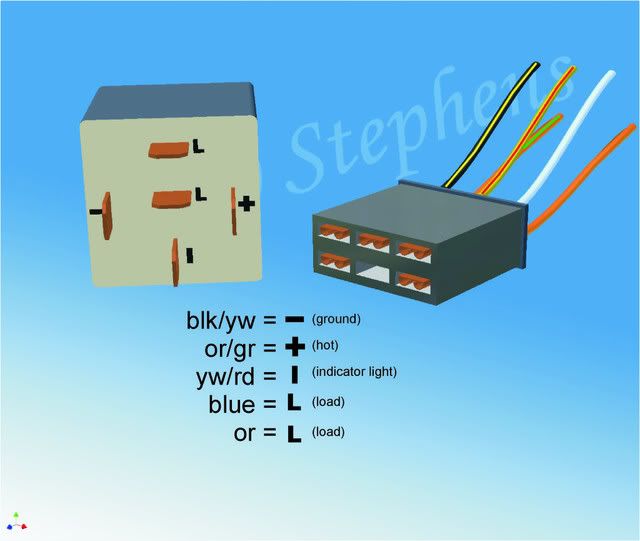
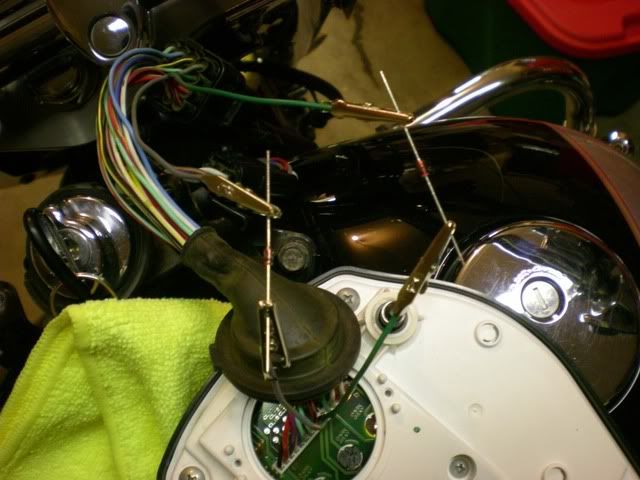
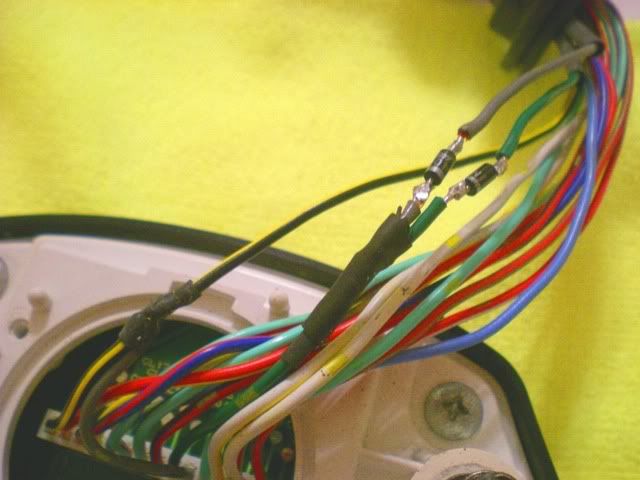
Do you want LED Running, Brake, and Turn signals without installing load-equalizers? Or maybe, you want to additional turn signals without affecting the blink rate? I’ve done it, and here’s how I converted the bike’s system: As you may have found, replacing the Tail/Brake light with an LED replacement requires no modification or load-equalizer at all. This is simply because you control the switches that operate those functions. LED turn signals, on the other hand, don’t pull enough electrical load for the OE thermal-blinker to operate properly. In most instances, an additional load (load-equalizer) must be put in-line for proper function. However, load-equalizers can get hot, overheat, and definitely defeat ONE of LED’s major advantages, energy savings. How long will your battery handle an incapacitated bike with incandescent Hazard lights on? Here’s a brief synopsis: I. Replace the OE thermal blinker with a standard Electronic blinker II. Strategically place diodes (ball-check valves for electricity) so the [single] turn signal indicator wouldn't tie Left and Right together. (all four lights were flashing at the same time) Let’s get started! I. I bought an electronic blinker from the auto parts store. You'll find the bike's original blinker mounted behind the coolant overflow tank. You'll notice right away this is not a direct swap, however, it IS easy. I've made a drawing to help make the replacement. At first I was going to make leads to jump from the bike plug to the new blinker, but then I realized how easy it was to use a small flat screw driver to release each of the individual female connectors from the plastic body. This allows you to simply plug each wire directly to the blinker. ;) I blew a lot of fuses to find the correct combination, and this is what I came up with. --WARNING, and reminder, making this switch will eliminate the auto-cancel feature of the stock turn signals. -- I may not have all the wires' functions labeled correctly, such as "indicator light", because everything will work fine, even the indicator, if you leave it off. Actually, for what ever reason, it works with as few as 3 wires connected But, I assure you this combination of all 5 works, as it as for me since 6+ months before this post. This should get you going same as normal, but more prepared for a totally LED signal (without load-equalizers), and already allows the addition of more incandescent lights without affecting blink rate.  II. You may notice that the electronic blinker wasn't enough to support LED turn signals alone. I was certain it would, alas, my first try of the new signals shown them all blinking in unison, like a Hazard light! :-/ Somewhere, the two sides, L & R, were crossing over and feeding each other. I found the culprit in the dashboard indicator light. Light Emitting Diodes (LED) are just that, diodes, a sort of ball-check valve for electric current. So I was able to deduce that the crossover was happening on the "front side" of the current. Both positive (+) wires of the turn signals run through the indicator light. In the original incandescent design, the left side would act as ground for the indicator during a Right signal, and the inverse for a Left signal. To separate the two, and still maintain an indicator, I did the following (illustrated in the attached pictures): Off the top of my head, I forget which is Right and which is Left, Green or Grey, but it really won't matter either way. I cut the Grey wire, connecting the end attached to the dash to the black/yellow striped "Ground", and tying the other end into the Green wire from the other turn signal. This connection allows the indicator light to be lit from a consistent direction. However, this will still cause crossover unless (12v) diodes are installed as shown. Be sure they are installed in the correct direction for flow. Now that any crossover has been eliminated on the positive (+) side, you should be able to install LED signals all around the bike! As an added project, later, I installed a resistor in line before these two wires powered the indicator light. With the correct resistor in place, I was able to replace this light bulb with an LED also.   My wife thinks I'm a little ate-up about lights, but this has been a lot of fun for me and a great learning experience since my background is Tool & Die, not Electronics. From here, you can make hazard lights simply by making a switch to connect the two sides on the (+) side, like the problem we just remedied, or with some further additions of strategically placed diodes and modifications to a store-bought strobe unit, you can add some strobing flashes to your Hazard lights. I sure as heck did!! Let me know how things are going for you, I'm glad to help if you need. –Jay (© 2009) Email: jestephens22@hotmail.com For some other ideas, and video of how this looks, Youtube user ID: jestephens KawaNOW: jestephens 
__________________
 2002 Nomad aka Bountyhunter VBA #27 VROC #18951 Login or Register to Remove Ads |

|
 |
|
|
 Similar Threads
|
||||
| Thread | Thread Starter | Forum | Replies | Last Post |
| LED for rear L/R signals | cybermate | 1700 Nomad, Vaquero & Voyager | 1 | 01-21-2010 11:35 AM |
| LED signals without Load-Equalizers | jestephens | Vulcan Nomad/Vaquero/Voyager | 7 | 07-06-2009 07:00 AM |
| LED signals without Load-Equalizers | jestephens | 1500 & 1600 Nomad | 0 | 07-05-2009 04:04 PM |
| LED signals | classic1 | 1500 & 1600 Nomad | 5 | 12-04-2008 07:52 AM |
| led turn signals | 1500 & 1600 Nomad | 4 | 08-03-2008 03:22 PM | |