|
|
|
|
#1 |
|
Sr. Contributor
Join Date: Apr 2008
Location: Tamworth New Hampster 06 1600
Posts: 12,484
|
Info on swing-arm service from mac
Well getting the bike secure on a lift, raising the lift, blocking the ft end, tyeing the ft brake On, so when the rear wheel is lowered the bike can't tip forward.
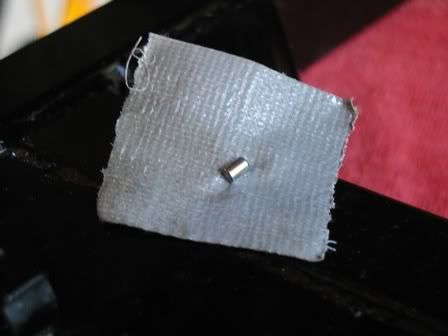
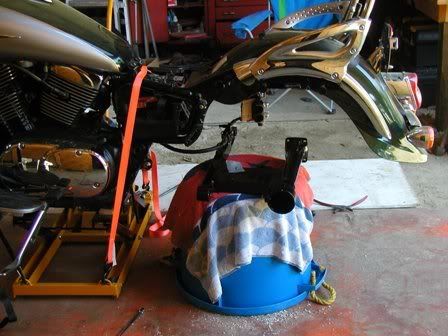
If the exhaust is stock, pulling off both mufflers, if it is V&H pulling both sets of pipes and mufflers, and having head pipe gaskets on hand. Then drop the rear wheel, hanging the rear caliper on a hook from the frame. Having a stainless steel new cotter pin and 2 swing arm seals. 2 kinds of grease. a high quality Molly grease, and a high quality chassis grease, and gear oil lube since you may as well drain it and replace it with new. A few wooden blocks to support the swing will be handy as well as a joint compound bucket and a old beach towel. On 05 and up the shocks should be removed since they have needle bearing top mounts that should be greased with the chassis lube. Rubber lube should be used on the shock lower mounts. (added) 1500's should be rubber lubed at top and bottom shock mounts) The acorn nuts for the shocks are the same 10mm thread as the gear box acorns. The shock OD is 17mm while the gear box OD are 14mm. You can mix them up sort off, but don't!!! You'll see. With the wheel off and out, you will want that bucket under the bike and some blocks right away, so the swing arm doesn't hang in space, and cause possible harm to the drive shaft. There are something like 4 brake line holders, 2 you can pull the brake line from and 2 you can't. The type you can't are welded wire and i recommend you don't cut them. Remove the line from the 2 you can. Then pull the long bolt that is under the plastic cap. Be certain the blocks are holding the swing-arm here, and support it well. Next go to the left as seated side of the bike with a small OD pin punch, and a rag. Pull the rubber boot between the engine case back to engine side and making sure the tranny is in neutral look for a hole in the drive shaft coupler, around 3/16th". Once you locate that hole stuff a rag all around between the drive shaft coupler, and then it is a good idea to place a dead pillow case on the floor under the same area. Depress the pin pushing it down thru the hole, but only around 1/8th inch, and slip the swing-arm and the drive shaft back around 1/4 inch. Put the drift down, and then ever so slowly pull the drive shaft and swing arm back and set them on the bucket, WATCHING hard for that pin! It may stay right in the hole and it may jump and fly, and you don't want to loose it! With a rag clean that pin right now, then duct tape it to something big!  Spin the swing arm on the bucket, removing the wooden blocks so it can be worked on, on you new joint compound bucket bench.  Pull the drive shaft, clean it, clean the gear box splines clean the rear wheel splines on the wheel. Clean the 3 spacers and the long bolt, clean the swing arm needle bearings. Use chassis grease to lube the 3 spacers inside and out, grease the inner swing arm tube with the same with a dowel and a rag, like cleaning a rifle. Grease the ends of all the spacers and the long bolt, Use chassis grease on the swing arm bearings Use the Molly lube for all splines, get sloppy. You may be able to leave the saddle bag guard on, but I wanted pics...to look like this. Takes me around 5 hours, but I don't cut any corners, since with a car tire i won't being getting in there again for a lot better than 7,000 book time service, unless something else goes wrong. I work alone... my back is trash, and that rear wheel is heavy for me. To get it up or down I sit on the floor and get my knees under the tire, to lift or lower. Going back on the tranny needs to be in 1st so the gear box spline won't turn, and it will allow you to find the spline as you lift and turn the wheel a bit. """""IF""""" you are thinking about any shims, with the swing arm seals installed, install the swing arm with NO drive shaft! Install the shocks, and then stop installing anything else and check the side to side slop, then get the shims made up as (2) 1/2 the thickness of the slop and put on on each end of the swing arm. The ID is the OD of the 3 spacers, the OD of the shim is just bigger than the seal OD. The shims will ride on the spacers like the seals do. At first this idea was confusing me and I want to make sure you get this correct. I hope I got every thing. Mac.. (added) Be sure to look up gadjet's in-site as well.
__________________
 06 1600 Nomad Just call me Mac molon labe come and get it Login or Register to Remove Ads |

|
|
|
#2 |
|
Member
Join Date: May 2008
Location: Refugio , Texas
Posts: 359
|
Info on swing-arm service from mac
Here is another link with a lot more pictures. Not a Nomad but the swingarm is identical.
http://www.kawasakimotorcycle.org/forum/.... 2-22-07-a.html
__________________
2008 Vulcan Nomad |

|
 |
|
|
 Similar Threads
|
||||
| Thread | Thread Starter | Forum | Replies | Last Post |
| My Observations on Swing Arm Service | hammer | 1500 & 1600 Nomad | 3 | 05-21-2010 05:52 PM |
| Moved: Info on swing-arm service from mac | macmac | 1500 & 1600 Nomad | 0 | 04-18-2010 09:04 PM |
| swing arm spacer ?? | recumbentbob | 1500 & 1600 Nomad | 4 | 04-17-2010 11:03 AM |
| Swing Arm Serviced | rooster1 | Vulcan Nomad/Vaquero/Voyager | 7 | 05-04-2009 07:05 PM |
| Swing arm maintenace | Idaho | 1500 & 1600 Nomad | 45 | 07-13-2008 01:03 PM |